
How to Manage over 10GB Digital Assets Fast and Easy Eagle App Review
I’ll be going over how and why I use Eagle to manage my digital asset library of images, videos, and more.
👉🏻 Eagle App: en.eagle.cool
Saving Images Before Eagle App
Prior to discovering Eagle, I had been downloading images via “Right Click>Save image as…”and manually placing them into folders. My old workflow consisted of downloading every image off the internet that I found interesting or could be used for reference, then at the end of every month I’d put all the downloaded images from that month into one big folder. This left me with an unorganized pile of images that ended up being scrambled to the point that they were never usable.
I ended up with the mess below after a year of downloading all the stuff that caught my eye, and that’s simply my raw downloaded images and videos, not even the stuff that I did organize into a folder structure.
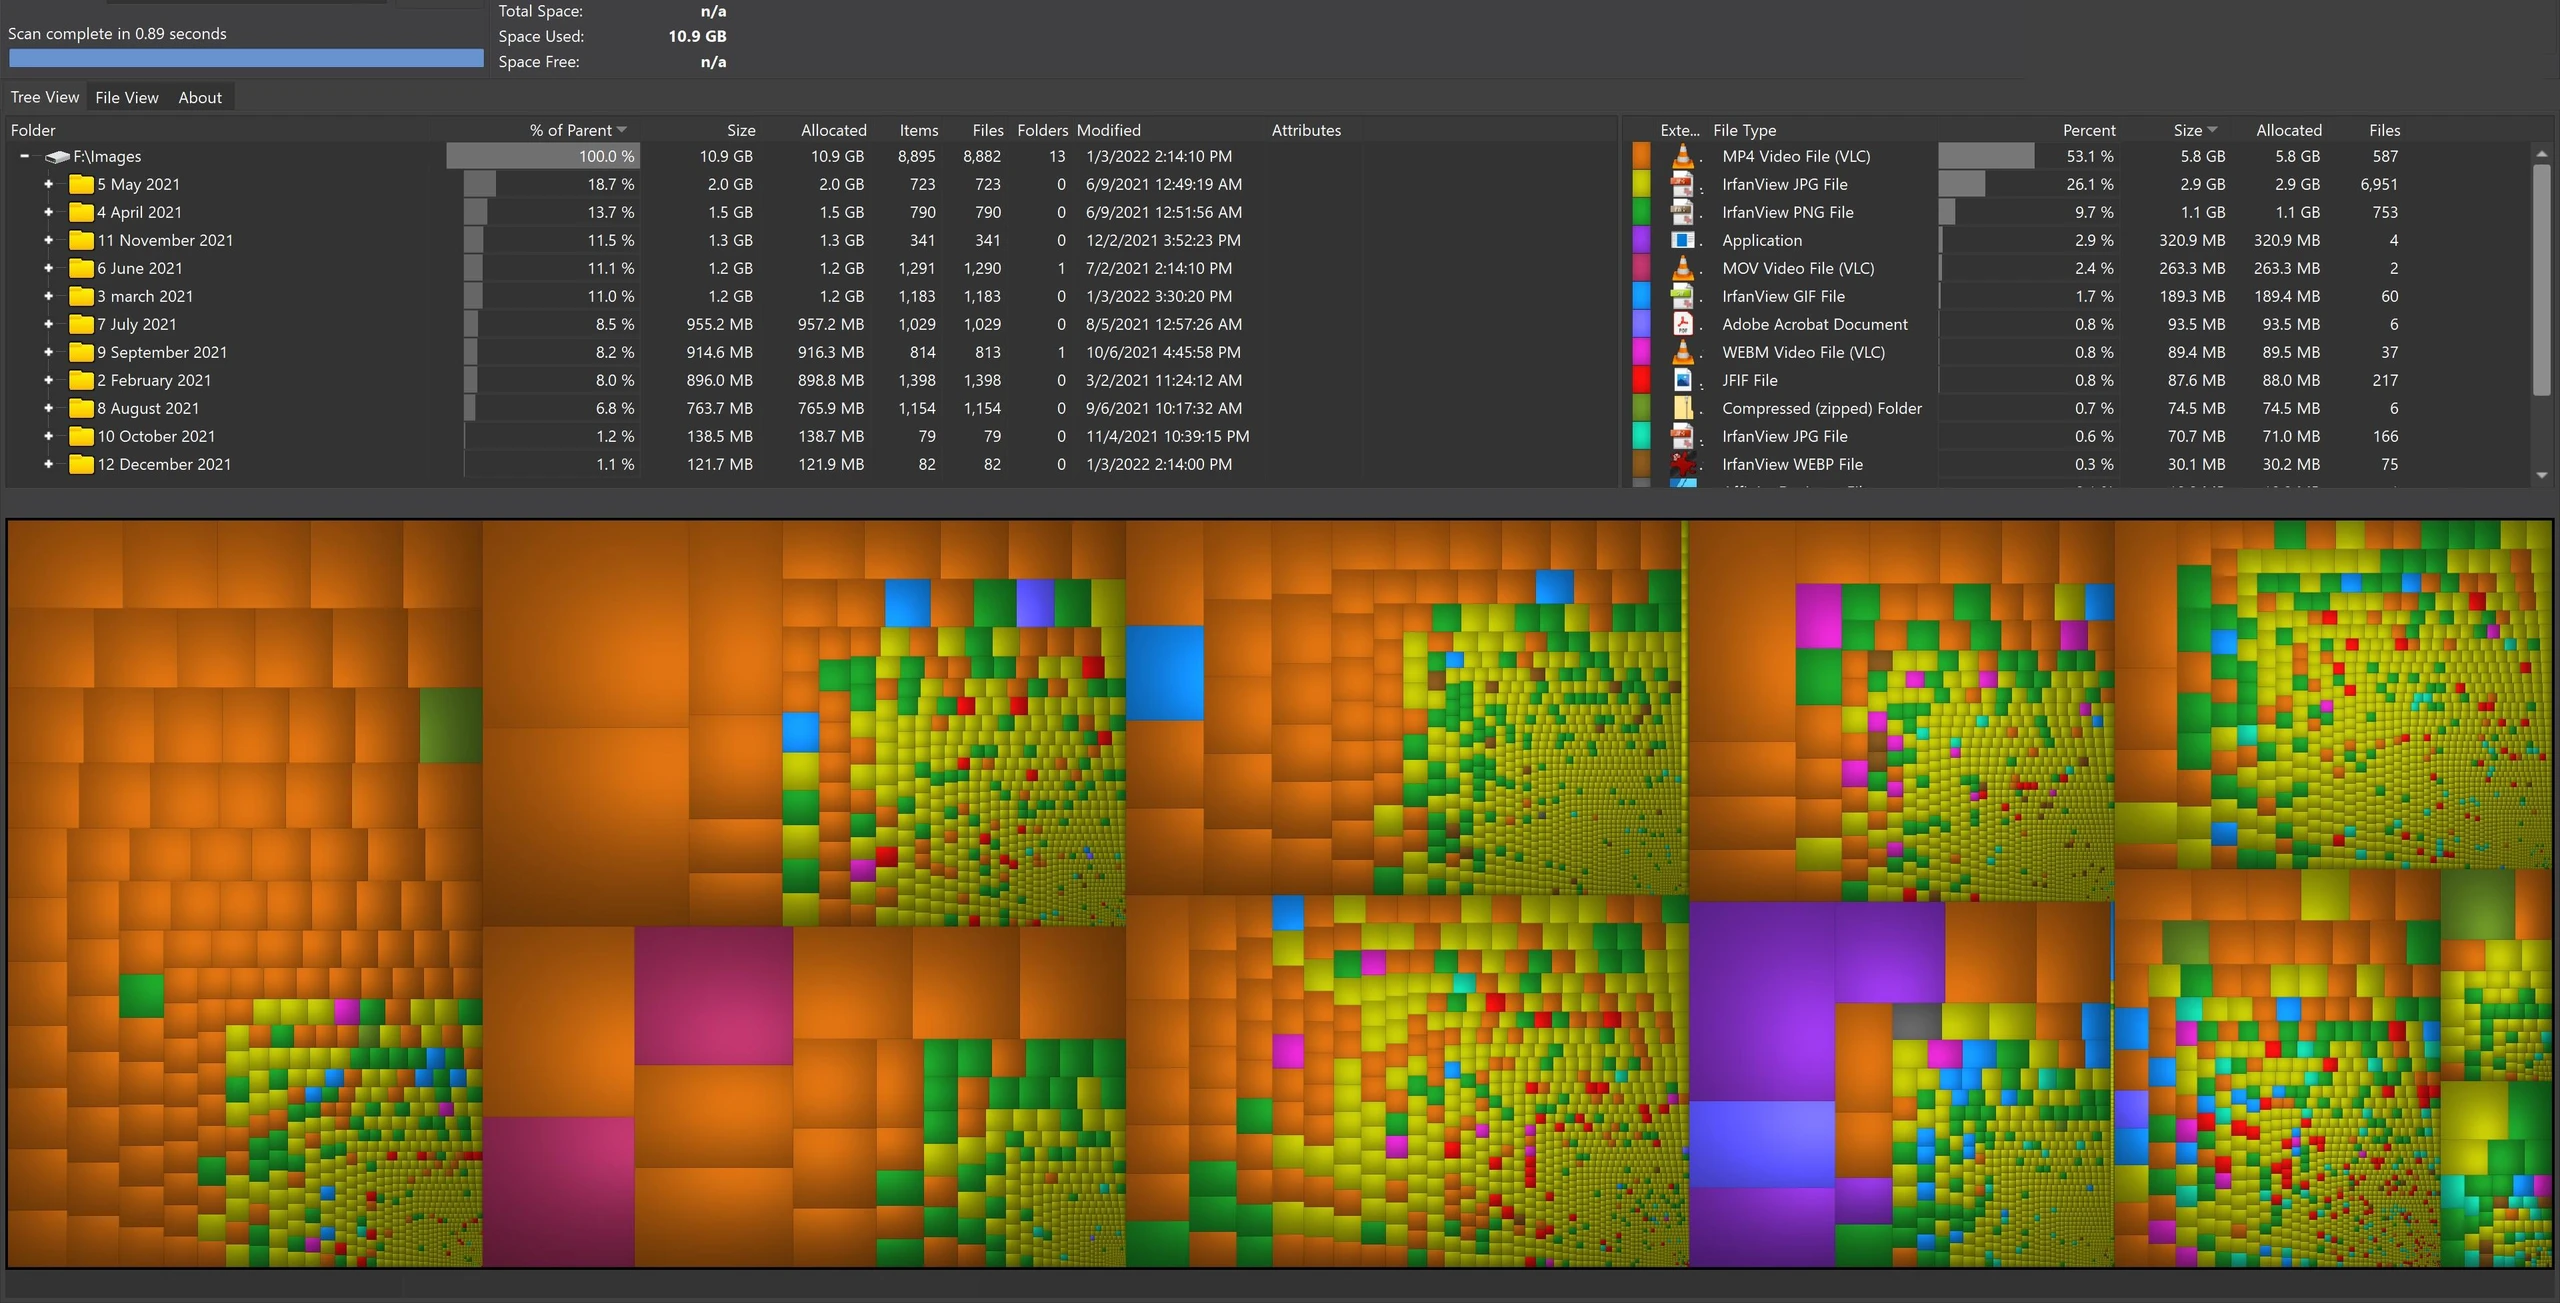
Image from: Tasted Potential
A Wiztree screenshot of the 8,000+ files that I manually downloaded last year. Lost in a huge pile over 10GB. Practically useless in this state.
When working on a project, I’d make a folder for just that one project’s references. The issue with that method is I can’t easily access the contents of that folder again unless I remembered what images I had saved in there. So sometimes I’d make a copy of a reference and put it separately into its own categorized folder tree in my “Images” directory.
This “system” was cumbersome to navigate and had many duplicates wasting hard drive space. None of this was ideal, and the saved images were actually used as reference maybe 10% of the time, when the other 90% of the time I would be doing new Google Image searches from scratch for each project. So there wasn’t really a point to me storing all these references.
This was basically a black hole that I was just throwing my references and ideas into. For the few that I would organize into folders, those were a little easier to look back up again later for reference, but it was extremely slow to navigate all those folders and thumbnails in Windows Explorer.
I would also run into the problem of having images & videos that could fit into two categories, so I often made copies and placed each one in a “relevant” folder. This meant that I was often duplicating or even tripling my files just to try to be able to find them again in the future should I forget the exact category I assigned it to.
This was my old nightmare “system” of organizing my references.It was far too time-consuming, slow, and redundant. You can see a little bit of me trying to make folders for each “tag” that I was applying and that got tiresome really quickly.
This was my old nightmare “system” of organizing my references. It was far too time-consuming, slow, and redundant. You can see a little bit of me trying to make folders for each “tag” that I was applying and that got tiresome really quickly.
When working on projects, I often found myself digging through various folders and subfolders, taking more time than I’d like and also getting bothered by the amount of space I was wasting by duplicating my references across multiple directories. I was desperate to find a better solution to this because it was wasting time that could instead be spent being productive. So I began searching for digital asset management software.
I came across a few different sites that led me to discovering Eagle. The first was the result of doing many Google searches for Reddit threads that discussed programs for managing photos (and later on videos). Reddit is usually one of my preferred places to find people sharing their thoughts on something because it can often be the direct views and experiences of users. The other main place that I saw Eagle show up was on alternativeto.net. I noticed it showing up as an alternative to Adobe Lightroom/Bridge, DigiKam, and other similar programs. The screenshots and demo videos looked quite appealing to me, so I checked out Eagle’s website immediately. It didn’t take long for me to start the 30-day free trial because the videos and descriptions showed how clean, feature-filled, and most importantly: fast, the software was.
How to Save References With Eagle App
These are the main ways I use Eagle in my various workflows:
Single and Batch Downloads Using the Browser Extension
The main method in which I now collect image references is via the browser extension that links to the desktop application. I’m using Brave as my browser with the Chrome Extension found here.
For individual images, I use the dragging method of clicking on an image that I want to save and dragging it a little to the left, about an inch or so. Dragging with the extension enabled brings up a panel where the left side simply adds the image to the “all” folder, whereas dragging to the right side of the panel lets you choose a folder to put the image directly into.

Image from: Tasted Potential - Drag to the left panel to save to “All
If I’m on a page that has many images I’d like to download, I use the extension’s Batch Download feature. I could use the shortcut of Alt+1, but I instead usually click the extension’s toolbar icon and choose “Batch Save.” Doing so makes Eagle pop up to the front of your computer and shows you every asset that can be downloaded. From here, you can choose to download every single item, or to instead download only the specific images that you want. Since webpages tend to show a lot of assets in addition to the main content you’re looking at, I find it best to choose only the specific range of images you want in order to avoid cluttering your library with random icons, logos, advertisements, and text-images.
When choosing what images to download, you can click one image, then Shift+click another image to select all images between them. You can also Ctrl+click individual images to add one at a time to your selection of what will be imported. Finally, you can also invert your selection so that the opposite can be selected. Then all you have to do is click import and you’ve now got your assets downloaded.
Eagle also detects whether an image you are trying to download is already in your library or not, and if it is, the default setting is to ask if you still want to import the duplicate file. I keep this setting on because I’m paranoid about missing a reference or two, so I manually tell Eagle to not download the file that is trying to be imported.
Here’s a video of all three of those things in action. First an individual download, then a batch download, and finally a prompt for a duplicate image attempting to be imported.
Grabbing all the images you want from a webpage this quickly saves tons of time.
Rapid Image Downloading
One of my favorite things about Eagle is how quickly it lets me download lots of image references. Oftentimes I’ll have many tabs open when I’m web browsing or looking up references. Because Eagle’s browser extension is so convenient, I can rapidly jump from tab to tab and download the specific image I want to save for later use. This is of course easiest to do when all the pages have the same layout so that I can just open a tab, click the same spot and drag to save, close the tab with Ctrl+W and then repeat the process on the remaining tabs.
In the following video you can see how I had a bunch of tabs open for t-shirt designs that stood out to me on a merchandise website. Using Eagle’s browser extension, you can see how I grab the main illustration image from each page and save it into my library.
I use a different number of downloading methods in this demo to show you the options you have. To save you can:
- Left Click+Drag to the left to save to “all”
- Left Click+Drag to the right to save to a folder
- Alt+Right Click to save to all
I usually use the dragging method, but the Alt+Right Click can be quite fast for rapid downloads. You can see the confirmation of the successful download in the bottom right corner of the screen. Additionally, you can click that notification to open up Eagle with that image selected in your “All” folder.
Moving from tab to tab and saving each image is very easy
Integrate Eagle App With Other Software - PureRef
Another program I use in my creative process is PureRef. This program is great for viewing lots of images in one large space, with the ability to position them freely, rotate, scale, flip, align, and more transformations. I find that PureRef is great for creating moodboards and reference boards for my projects.
I was so happy to find out that Eagle works perfectly alongside PureRef! I first use Eagle in the research phase to import all my images and references into an organized database, then I drag the images from a project folder I’ve made in Eagle over to PureRef to create a moodboard for that project.
It’s as simple as selecting the images you want and then dragging-and-dropping them into the PureRef window. Here’s a video showing you how I do so:
Eagle works seamlessly with PureRef, my favorite moodboarding software.
This is particularly helpful because I am able to organize the references in Eagle so they can be found and used again later. Before when I just dumped everything into PureRef, I couldn’t easily access those images again without opening each PureRef board to see its contents, and even then I can’t remember exactly what is inside each moodboard. Also, Eagle handles large numbers of images better than PureRef because it isn’t trying to constantly render them all at full resolution. Each program has its place in my pipeline and I love that they work well with each other.
There are many other features that Eagle offers, such as displaying various file formats including videos, GIFs, audio, fonts, and more. A lot of these basic examples are explained and shown clearly on Eagle’s Knowledge Base site. I have more videos of me performing several of these actions with my own asset library, but this post is already getting to be quite long and I want to focus on the specifics such as how I organize my assets and the tricks I’ve learned during my free month trial of Eagle. You can see the rest of my demo videos in my “Using Eagle Asset Organizer” playlist on YouTube.
How to Organize My Eagle Library
There are many different ways I use Eagle’s features to keep my library organized. This allows me to access the references again in the future by spending a little bit of time when importing them so the assets are categorized and can be found again later as needed.
You’ll see that Eagle offers many different ways to categorize, tag, and filter your library. The following are examples of the main ways that I use Eagle’s options, but because the customization is very flexible, you may find your own unique methods of organizing your personal digital asset library.
My Folder Structure Using Auto-Tags
I use a combination of both tags and “old-fashioned” folders to organize my library. The best part of what Eagle offers is that you can use both systems simultaneously to your advantage.
For example, you can set folders to auto-tag anything that you put into them. In Eagle, you can already tag selected items by pressing the T key or by clicking in the tag property window on the Right Panel of the program.
You can also have these tags automatically be applied by placing the item into a folder that is set up to auto-tag its contents. Even cooler, every folder in a nested group can apply their own tags, so you can add several relevant tags to an image in an instant just by dragging your image to a folder that is within other nested auto-tagging folders.
In the next video I show an example of what I’m talking about. This alone saves so much time since you can rapidly apply multiple tags to an image.
First, you can see me use Eagle’s built-in global screenshot feature by pressing Ctrl+Alt+E to save a screenshot of an image that I only wanted to save a portion of. It gets imported into Eagle with a default tag of “Screenshot.” After that I make a folder for all the future animal images I’m going to save. Within that “Animal” folder, I create a “Big Cats” folder for things like lions, tigers, leopards, etc. This creates a logical structure to organize these types of photo references.
The next part is where Eagle works its magic. In each of these two folders, I set auto-tags for “animal” and “big cats” respectively. This makes Eagle automatically apply those tags to whatever items are placed in those folders. And the cool thing is that nested folders also get tagged with their parent’s tags, all the way up. So by dragging an item into my Big Cats folder, it gets tagged with “animal” AND “big cats.” With a well-organized folder tree, you can rapidly apply several tags at once to your assets. And of course you can continue to manually add tags specific to each image. But the Auto-Tagging feature gives a great starting point for your organization!
At the start of the video you see me use Eagle’s Global Screenshot shortcut which is Ctrl+Alt+E.
Creating and Coloring Tag Groups
A smaller, but quite helpful feature of Eagle that I use is Tag Groups. This allows you to organize your organization! Joking aside, when you start to add lots and lots of tags, it can be overwhelming to see all your tags at once when you click on the All Tags section on Eagle’s left panel. The solution to this is Tag Groups, which are basically tags for your tags.
I currently have six tag groups: Marvel comics, DC comics, Anime, Videogames, Game Studios, and Artists. This allows me to open a tag group to see all the tags I’ve set in that group. And speaking of setting tag groups, it’s as easy as anything else in Eagle.
To make a Tag Group, click on the All Tags section on the left panel of Eagle. You will see a new column on the left where you can create tag groups. Simply click the plus arrow and type in the name of your new tag group. You can additionally set a color for the tag group to help you quickly identify it in the future.
To add a tag to a specific group, you can either:
- Right-click a tag in the All Tags page and then click “Add to Group…”
- In your “Add Tags” popup menu in Eagle’s main window (when you press T or click the Tags section in the right panel) you can right-click any of the tags you see and select “Add to Group…”
Here’s a video that shows me creating, adding to, and coloring Tag Groups
After creating and populating your tag groups, you can now access them via the All Tags section on the left, or by clicking the tags filter at the top of the main window and choosing a group or sub-tag from there. This is a great way to see all the tags of a specific category and the overall concept they are united under. This becomes increasingly useful as the number of tags you use will grow over time. It’s also helpful for organizing an overarching concept applied to many smaller tags that may be unsuited to a folder tree system.
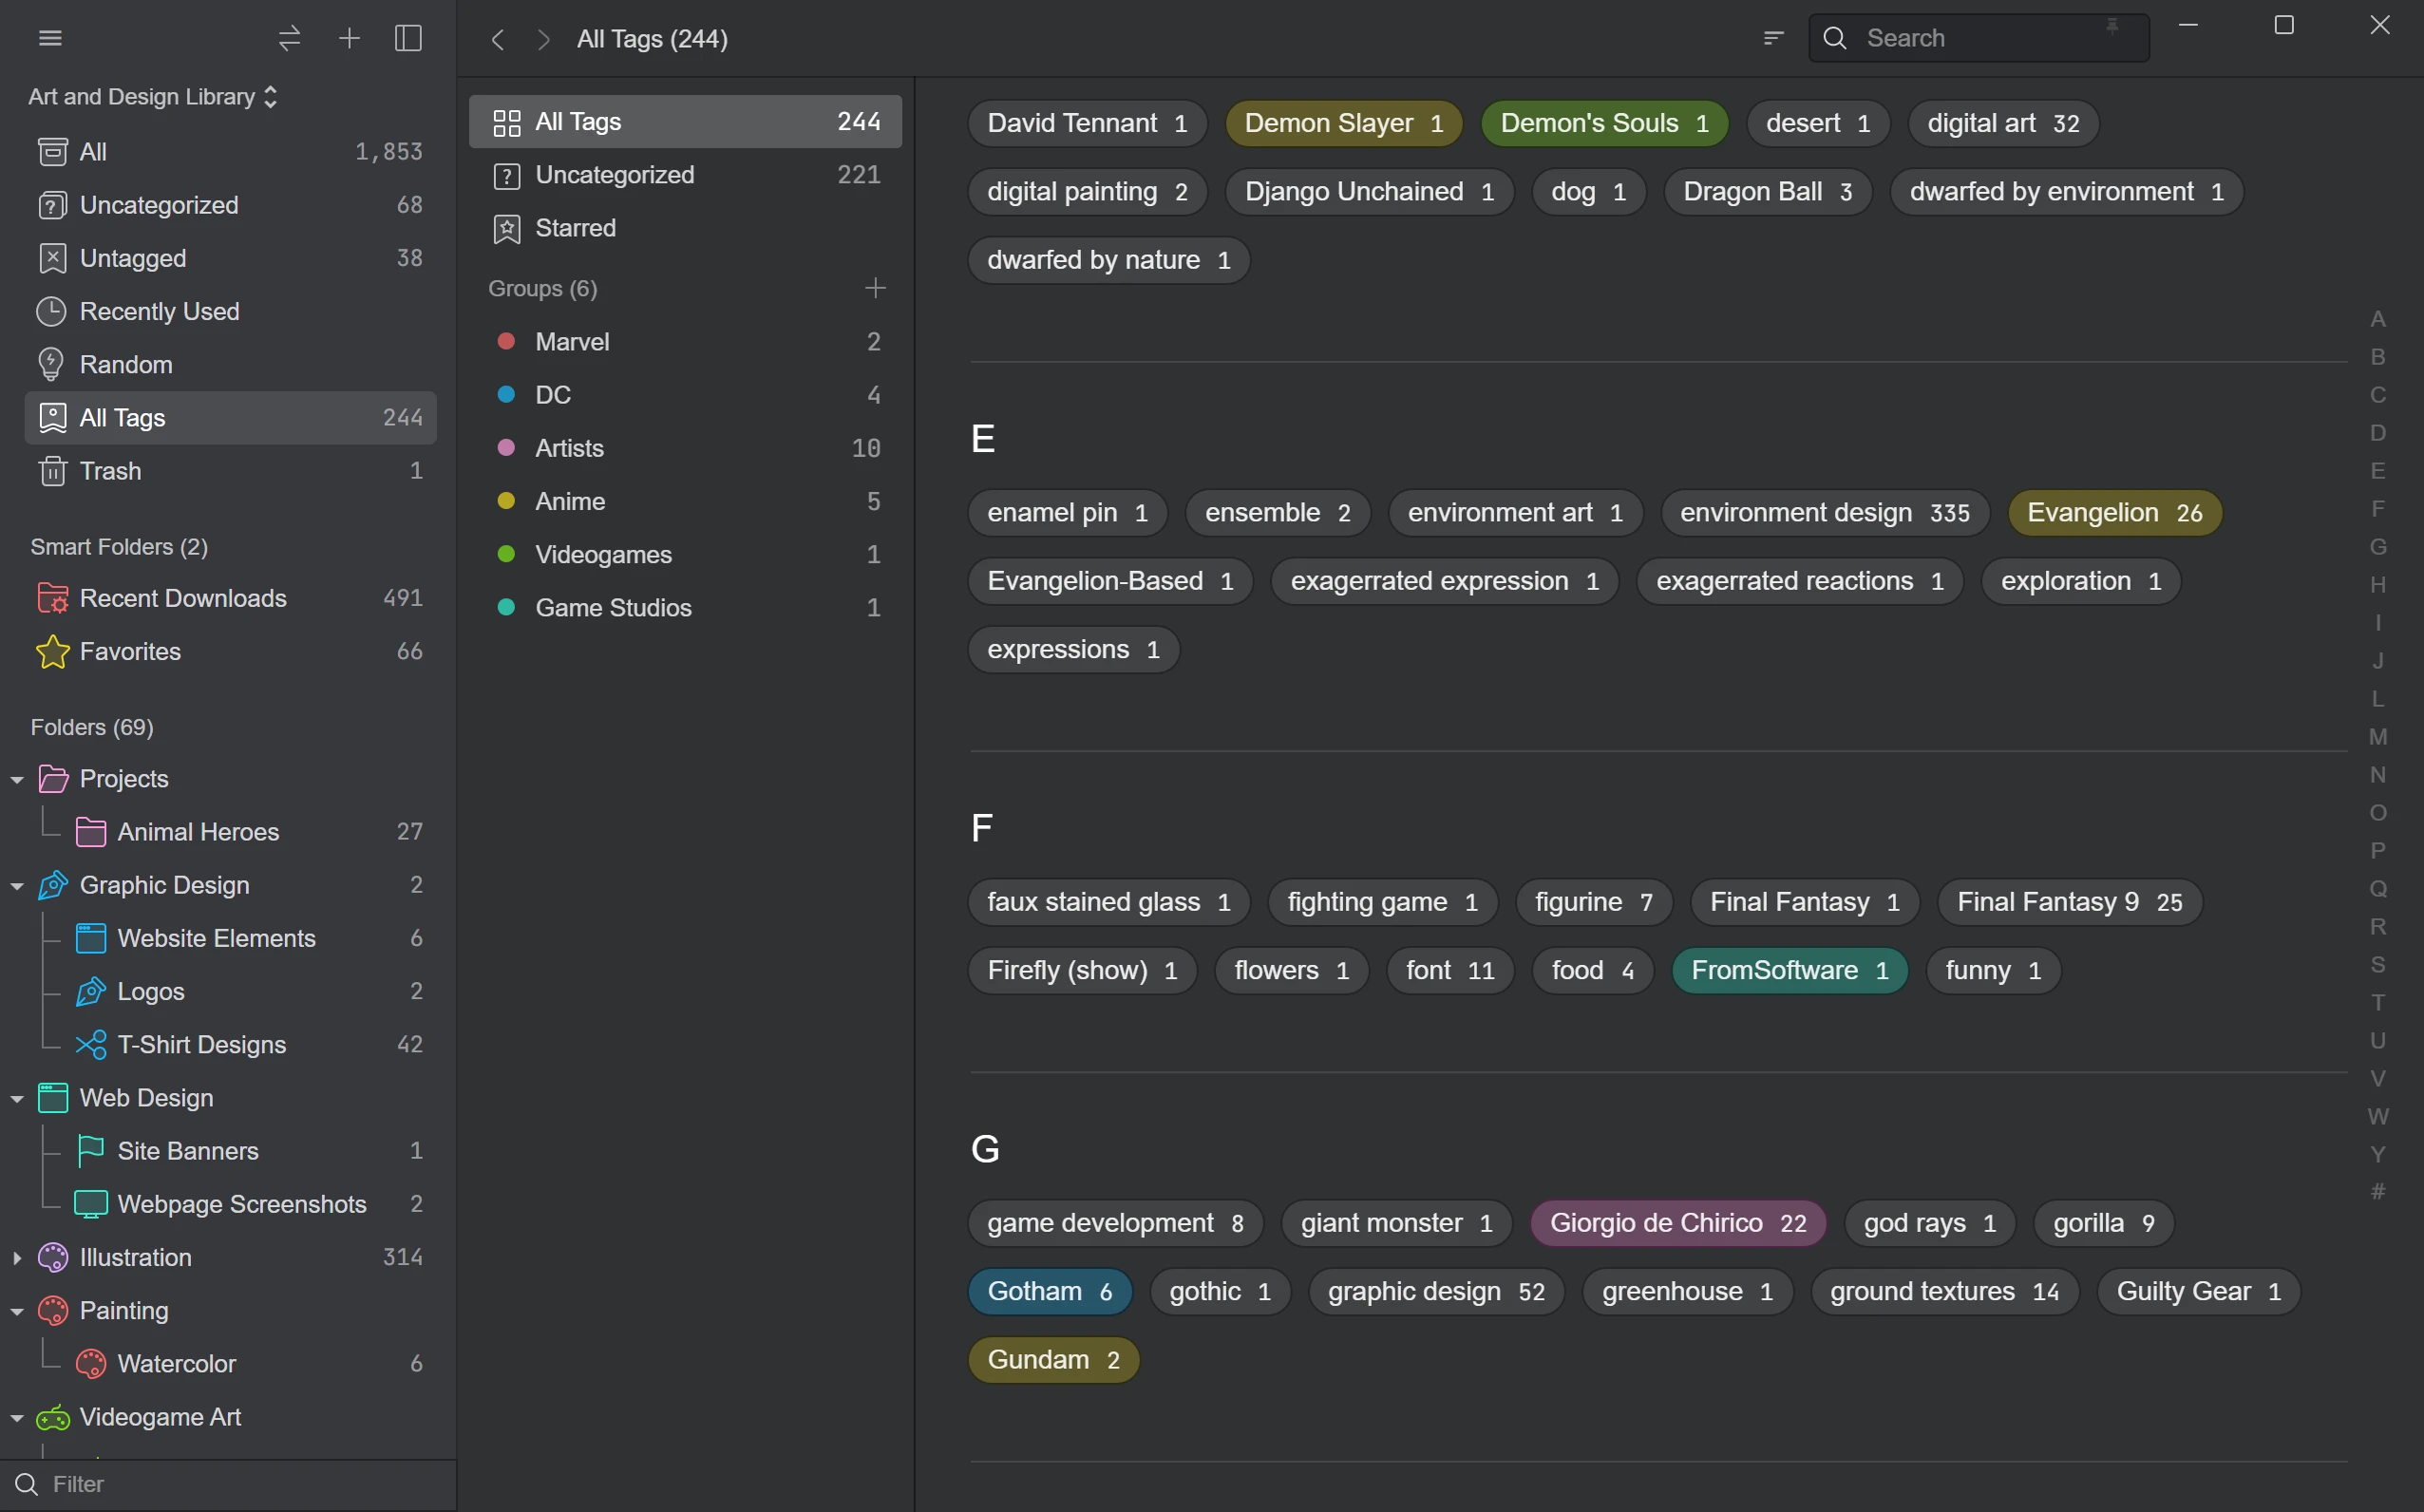
Here you can see how the colored tag groups can help you isolate specific tags from the large numbers of tags that will accumulate over time
Making a “Quick Favorites” Smart Folder Using the Star Rating System
One of the cool features of Eagle is its Smart Folder system. The Smart Folders are essentially a way to create a one-button preset for any set of filters you might normally use. This allows you to create folders that can show you a precise set of filtered assets instead of having to enter each filter setting by hand every time.
The first Smart Folder that I made was a Favorites folder. This is very easy to do, and it allows me to see all the images that I have rated as 5 stars with just one click instead of filtering by rating in the main window.
By the way, Rating images is a breeze in Eagle. The default shortcut is the 1-5 keys, so all you have to do is select an image (or multiple) and then press 1, 2, 3, 4, or 5 to set the corresponding number of stars to your image. You can also rate by clicking the gray stars on the right panel if you’d rather stick to mouse-only navigation.
Once I had several images rated as 5 stars, which is my personal method of saying these are the best of the best in my library, I went to the Left Panel and clicked the “New Smart Folder” button. Doing so opens up a window that allows you to name the Smart Folder and add the different filters that will decide what the contents of that folder will be.
My “Quick Favorites” folder simply shows anything that is rated 5 stars, so it’s a very basic smart folder! You can see a video below of how I created this simple example of a smart folder.
This is one example of a basic smart folder. Other examples can be your 5 star images tagged with “landscape”, or show images tagged with “action pose” but are only .jpg file type, and so on.
Eagle App Tips and Tricks
There are many things you can do in Eagle to organize, browse, and utilize your digital asset library. In my time using it during the trial period, I’ve found some tricks that I like to use in order to better navigate the hundreds (soon to be thousands) of images, videos, and links that I’ve been saving. Here are a few that I’ve been using:
Creating a Custom “Recent Downloads” Folder
One of the issues with importing large numbers of images is that you can very quickly be overwhelmed by a flood of images. Especially if they are all visually similar, by one artist, or specific to a single subject matter, this can make it difficult to get back to the individual or small groups of images that you may have recently downloaded manually.
I often come back to Eagle to look at my most recent 30-50 images in order to tag, categorize, and make notes for further use. But if I also just imported an entire ArtStation page like I did in this video:
Saving an entire ArtStation profile for local browsing is so easy with Eagle!
… I may have just added 300+ images to my library and it can be a royal pain to scroll through them all and get back to my manually imported single images. So my simple solution to this problem is creating a Smart Folder that filters out anything that I’ve tagged as “bulk import.”
Now, this requires me to be diligent and always tag each large chunk of images I’ve imported, whether it be from an ArtStation profile or a drag-and-drop import from an image archive that I extracted on my computer, an entire image folder’s contents, etc. Thankfully, the FIRST thing that Eagle does once you do a large import is keep all those brand new images highlighted. From there, I can easily add a tag that will apply to ALL of those new images.
So after I import a large collection, I tag them with “bulk import” and then I can return to my “Recent Downloads” smart folder to see only the specific single images I’ve recently downloaded.
This is a pretty simple thing to use the Smart Folders for, but it makes a huge difference to help me not get overwhelmed by huge numbers of assets being added to the library at once. You can see a video of me setting up this specific Smart Folder in the video below:
Setting Up a Recent Downloads Smart Folder in Eagle
Browsing by Using the Color Wheel
Something unique that Eagle allows me to do is navigate and explore my library by wandering through the different sets of images organized by their main colors. This can be great to look for inspiration or to try to capture a certain mood that is best expressed by a dominant color scheme.
Eagle makes this very easy with the Color Filter functionality. What I do is click on the filter icon at the top of the screen to display the filters if they aren’t already visible (1), then I click the “Filter by Color” option (2), and then I finally click and drag along the color slider (3) to see different groups of images that have a main color.
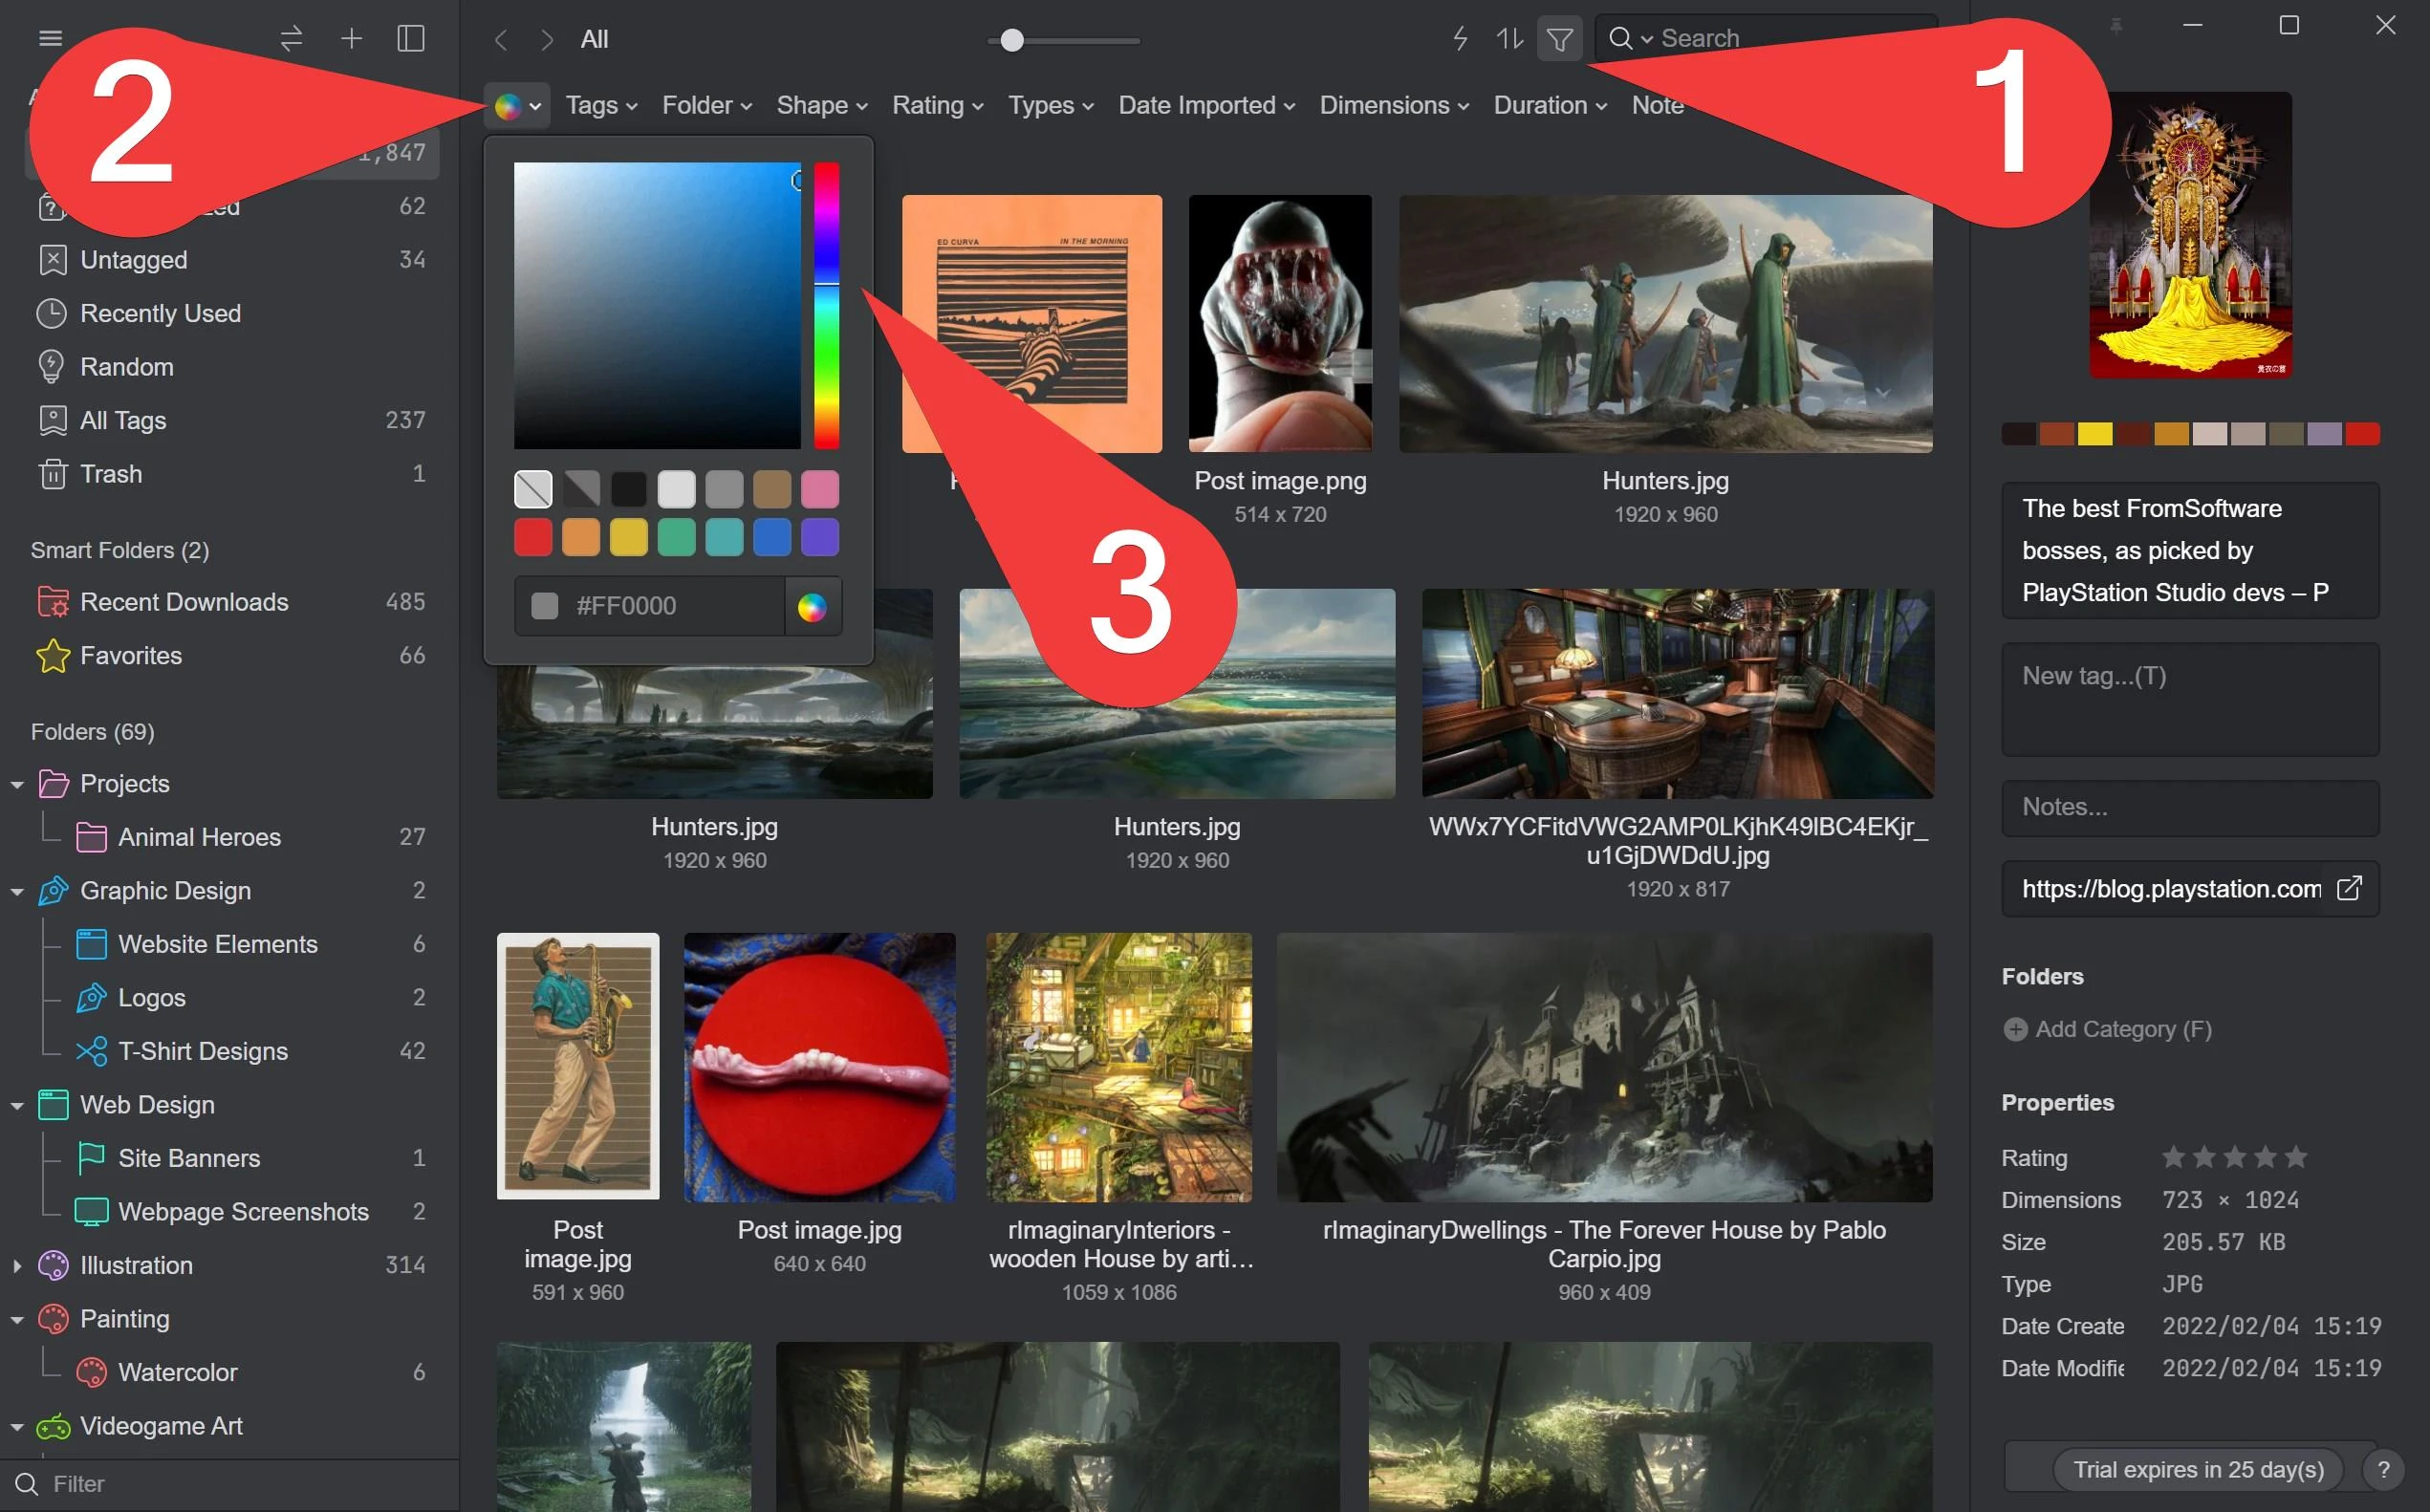
Image from: Taste Potential
Here you can see a video of this type of browsing in action:
Sometimes I’m surprised at what I find when using the color filter.
Using Exclusions to Filter Searches
This tip is another simple one but comes in very handy when trying to find specific types of references, especially when it comes to assets that have multiple tags applied to them.
Eagle uses a tag exclusion system like Google’s or other image browsing sites to exclude results from searches. This simple task is done by including a “-” in front of the tag that you want to exclude from your search. Do not put a space between the minus symbol and the tag, just add it at the start of the tag you don’t want to appear. For example, if you wanted to search for “animals” but filter out “tigers”, you can type this into your search bar in Eagle:

Image from: Taste PotentialThis depends on the tags that you have manually added to Eagle, so you are in fact filtering out the different types of tags that you have created. Here’s a video showing how I use the tag exclusion in a search:
In the video I used the search: “black background -movie-based”
You can always go to the All Tags section on the Left Panel to have an overview of every word and phrase you’ve tagged assets with. This is also a quick way to view all images of a tag in case you didn’t think of typing it into the search bar in the main window. Simply double click a tag in the All Tags screen to show every asset with that tag applied to it.
Capturing Transparent Elements
A very convenient feature that Eagle’s browser extension includes is the ability to select an element when using the “Capture Area” screenshot function. This means that Eagle will automatically set the bounds of a screenshot based on the webpage element you clicked on.
I find it particularly useful when I’m trying to save an example of elements that are layered on top of each other on a web page, especially if the foremost layer has transparent portions in its design. If I try to do the typical drag-to-save on an object that has an alpha channel like that, I can’t also capture the background which is part of the overall design & artwork that I’m trying to record and study.
So instead of having to take a screenshot of the whole page or try to potentially painstakingly select a pixel-perfect area, Eagle’s browser extension allows me to quickly auto-select the region of an element and take a screenshot with those dimensions.
- To do so, you must first open the “Capture Area” function either by clicking on that item in the Extension’s menu, or by pressing Alt + 2.
- When you have the selection crosshairs visible, all you now have to do is hover over the element you want to screenshot and press Ctrl + Left Click.
- Now just press Enter or click the Save button and that’s it!
This will automatically choose boundaries for the screenshot that fit the element you clicked on, giving you a precisely-cropped image of all the elements on that part of the page. Ultimately, this is one of those tiny features that you don’t normally see advertised, but when you do need to use it, well, you’ll see how convenient and time-saving it is!
Here’s a video of this in action. You can see the first save which doesn’t capture the background, only the .svg.
Simply Ctrl + clicking the element makes it a breeze to record the whole design.
Why I Choose Eagle App to Manage Digital Assets
There are many other things that Eagle can do in addition to the techniques I’ve shown above. But what I’ve included in this article are the most common ways I use the program every day.
Some of the other features that I think make Eagle worth utilizing as my main digital asset manager are:
- support for many file formats including images, vector graphics, video, audio, fonts, and web shortcuts
- built-in screenshot software, especially in the browser extension which is great for capturing entire webpages
- extensive filtering options to sort through your library including tags, colors, metadata, rating, folders, aspect ratio, URL source, and more
Most importantly, Eagle is fast. By using the browser extension, I no longer have to right click, choose “Save As…”, and then select a location to save to. I can just drag the image a tiny distance and it gets downloaded almost instantly. The speed at which I’m able to accumulate relevant assets for projects that I’m working on, or even when saving an interesting or funny image that I’d want to use later, well, that’s what makes Eagle such a great piece of software in my eyes.
Also, I value being able to quickly and visually comb through my library with various different techniques. I can tag and filter items with just a few clicks. I can even easily back up my entire library by simply copying the library folder to an external drive.
I’m very happy with how much organization and ease of use Eagle has enabled for my image and video asset collecting. I highly recommend this program for anyone that is looking for a robust and fast way to manage all their visual digital assets.
Now I ‘ve got to get back to saving and studying more cool concept art!
The article is originally written by Tasted Potential- Eagle Makes It Easy.
Related Posts